






Will the XH80-Z801 Dryer Fit? Measure More Than Cabinet Width
The XH80-Z801 has listed dimensions of 600 mm wide × 640 mm deep × 850 mm high, but those measurements alone do not confirm that it will fit your laundry space. You also need installation clearances, room for the exhaust connection, usable door-opening space, and a delivery route that accommodates the appliance.
A recess that looks wide enough can still leave the dryer projecting into a walkway or force its exhaust duct into a tight bend. Before ordering, compare your measurements with the installation instructions for the exact version being supplied. The dimensions below establish the starting point; required clearances must come from those instructions, not assumptions.
Start with the appliance dimensions—and their limits
The published specifications for the XIAOYA Vented Dryer XH80-Z801 丨8kg distinguish between the unpacked appliance and its shipping package. Use the appliance dimensions to assess the installation space and the package dimensions to plan delivery.
A 600 mm-wide opening is not automatically suitable for a 600 mm-wide dryer. It provides no nominal allowance for side clearance, uneven walls, or positioning. Also confirm whether the listed depth includes all protruding parts and how the exhaust connector affects the installed depth. Those details are not established by the overall dimensions alone.
Measure the recess at its tightest points
Bring a tape measure, a spirit level, and something to record the results. Measure the space as it exists, including skirting boards, pipework, sockets, and worktop supports—not just the distance between the most accessible cabinet edges.
- Check width at several positions. Measure near the floor, midway up, and near the top, both at the front and farther back. Record the smallest usable width.
- Measure height from the finished floor. Check beneath the front edge of any worktop and underneath supports farther inside. Do not assume that removing the dryer’s top is permitted.
- Measure depth to the first obstruction. A water pipe or projecting socket may be the effective rear boundary rather than the wall.
- Check the floor. A slope or uneven tile can affect leveling and the available overhead space. Confirm the permitted leveling adjustment in the installation instructions.
For an under-counter location, the listed 850 mm height is only the starting measurement. You still need the specified top clearance and sufficient access to position the appliance without forcing it beneath the worktop. Keep cupboard doors and drawers in mind: their handles or opening paths may conflict with a dryer that sits farther forward than expected.
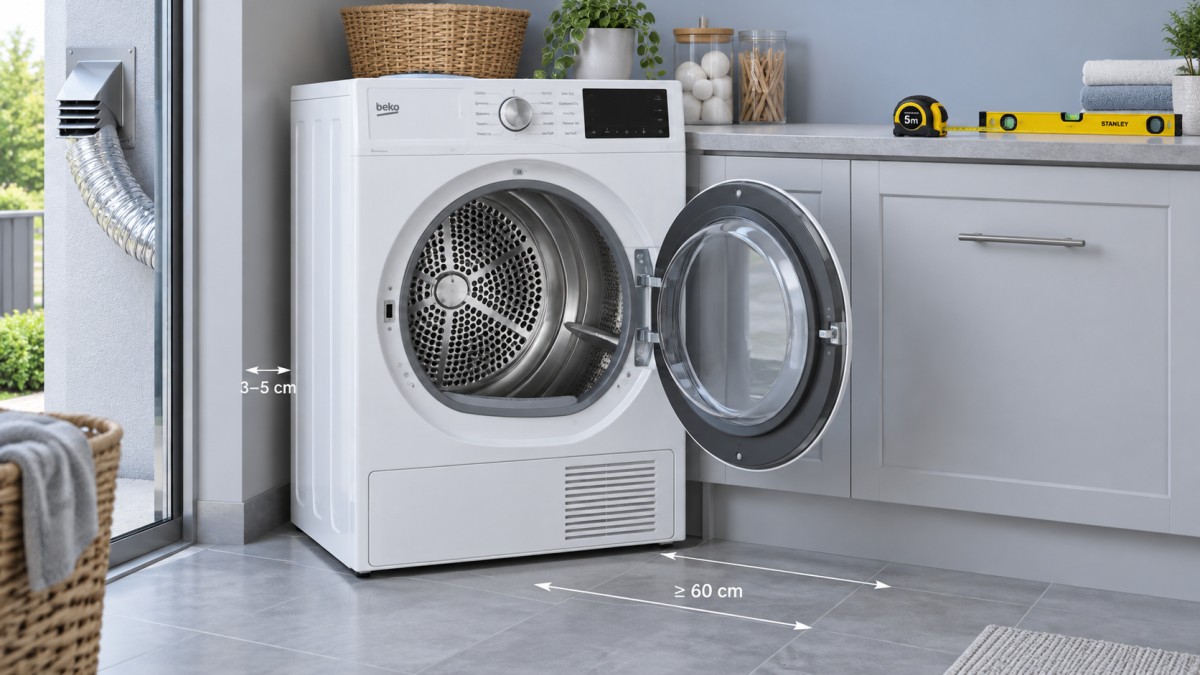
Depth is where a seemingly good fit often fails
The listed 640 mm depth should not be treated as the complete wall-to-front installation requirement. A vented dryer needs an exhaust route, and the connection may require space beyond the appliance body. Electrical connections and other obstructions can also prevent it from sitting as close to the wall as planned.
Draw a simple side view showing the wall, any projections, the proposed duct route, and the dryer’s front edge. Use this relationship when comparing the plan with your room:
Required installation depth = confirmed appliance depth + connection space + any additional clearance specified by the manufacturer.
Do not count the same allowance twice if the installation drawing already includes the connector. Equally, do not assume a rear-clearance figure automatically accommodates every duct arrangement.
A nearby outside wall may offer a straightforward exhaust route, but outlet position still matters. If the route involves bends or a longer run, check the permitted duct material, diameter, length, and bend limitations in the manual. Do not force the dryer backward until the duct is flattened just to align its front with adjacent cabinetry.
The exhaust must discharge outdoors through a suitable installation, not into a cupboard, roof void, or another enclosed indoor space. Where no suitable route exists, resolve that issue before purchase. A vented dryer is not made suitable for an unvented location simply because its cabinet fits.
Leave room to load laundry, not just close the door
This model lists a 180° door swing and a reversible opening direction. These features can help with layout planning, but they do not remove the need for clearance. Confirm the reversal procedure and any installation conditions before relying on a particular hinge arrangement.
Mark the proposed front corners on the floor with removable tape, then assess the space in front. Check whether a nearby wall, cupboard handle, toilet, or room door would interrupt the dryer door’s movement. The published specifications do not provide a door-sweep dimension, so obtain that measurement or the relevant drawing before approving a tight layout.
- Can you stand in front of the drum and transfer wet laundry without stepping around the door?
- Is there somewhere to place a basket without blocking the room entrance?
- Can the lint filter be removed and cleaned comfortably?
- Will the controls remain accessible beneath a worktop or inside the proposed enclosure?
For a cupboard installation, verify that the manufacturer permits that arrangement and follow its ventilation requirements. A cupboard door that closes neatly across the front is not evidence of adequate airflow.
Trace the delivery route before confirming the order
The shipping package measures 662 × 663 × 890 mm, which is larger than the unpacked dryer. Check the route from the delivery entrance to the laundry area, including gates, lift doors, stair landings, and narrow turns.
Measure the actual clear opening of each doorway with its door open. Handles, hinges, and stops can reduce usable space. At a right-angle turn, assess the adjoining corridor as well: passing through one doorway does not prove that the package can turn into it.
Ask the delivery provider whether unpacking before the final doorway is allowed and who handles packaging removal. Do not base the plan on tilting the dryer into an unapproved orientation. Stairs and restricted access also need handling arrangements appropriate to the listed weight; they are not simply another width measurement.
Resolve the remaining installation conditions
Physical fit is only part of installation readiness. Listed electrical versions include 110–120 V/60 Hz, 220–240 V/60 Hz, and 220–240 V/50 Hz. Confirm which version is being supplied and check its rating label and electrical instructions against the available supply. These options do not mean that one appliance accepts all three supplies.
Keep the outlet and cord routing clear of the planned exhaust connection. Any electrical changes or new wall penetrations should be assessed by an appropriately qualified installer. Likewise, a stacking plan requires explicit compatibility confirmation and an approved arrangement; matching appliance widths alone is insufficient.
Before buying, record three separate results: the smallest usable recess dimensions, the proposed installed depth with connections, and the narrowest delivery access. If any required clearance, duct detail, or door-sweep measurement remains unknown, send that specific measurement question to the supplier. A close fit should be confirmed against an installation drawing—not resolved by hoping the dryer can be pushed farther back on delivery day.

Request A Quote?
Stay updated with our latest news. We promise not to spam!